

Adrian Pavel
Adrian is one of the co-founders of Soft Cactus Studio and a full stack developer with over 8 years of experience.Share this article
Angular applications can be made SEO friendly by using pre-rendering. Today we will take a look at what that means and how to use it in our own content focused Angular applications.
Angular for content focused web applications
Angular is great for creating rich interactive single page web applications. It is also very useful for creating and managing more content focused websites, but it has a major drawback. Angular web applications are rendered on the client side.
This means that a crawler trying to index one of your pages needs to run javascript after requesting it in order to actually see the content. Most crawlers do not run javascript. Google search crawler does, but with some limitations and the results are kinda hit and miss.
Content oriented websites, such as blogs for example, need to be indexed by search engines in order for people to find them. There is no point in creating a blog if no one can find it right?
So how do you solve this issue if you want to take advantage of the organized way of creating your website with Angular but also want it to be SEO friendly?
One way is to enable server side rendering with Angular Universal. You can read more about this here. But what if you do not have the luxury of rendering on the server? Maybe you are using a static content hosting solution like Firebase Hosting. This is where pre-rendering comes to the rescue.
Instead of rendering your pages on the server on each request, you can pre-render each and every one of them before deploying your website and just serve them like any plain html+css+js website.
Sounds good? Let’s see how we do that. Don’t worry, it’s actually quite simple.
Sounds good? Let’s see how we do that. Don’t worry, it’s actually quite simple.
Creating a basic Angular project
I know that if you are reading this article you probably already have an Angular project that you want to apply pre-rendering to. If that is the case you can skip to the next section. For good measure and for the people who want every detail I will list the steps for creating the project.
We need Angular CLI for this, if you don’t have it installed open up a console and run:
npm install -g @angular/cli Then, in the folder where you keep all your projects run:
ng new my-pre-rendered-app Wait for the initialization to finish and then run the following command to move inside the folder:
cd my-pre-rendered-app Now here run the following command to start our application and open the browser:
ng serve -o After a while the browser should open and something like this should be shown. I am using the latest Angular version which at the time of writing is Angular 10. If your application looks different, don’t worry, it should not matter for the rest of the steps.

You can stop the server now, since we want to take a look at the “build for production” results.
What does our app look like to a search engine crawler
Let’s first checkout what a normal web crawler sees when it tries to index our page. The simplest way to simulate this is by using curl. If you don’t know what curl is you can read more about it here.
First of all let’s build the application in production mode by running:
ng build --prod This will create a dist/my-pre-rendered-app folder in which the results of the build process can be found.
Now let’s try and run this build. For this we will use a package called http-server which allows us to serve content from our machine. You can install it by running:
npm install http-server -g Once installed, from the root of our project run:
http-server dist/my-pre-rendered-app This will serve our application on port 8080 by default.
With our app running, open up a console and write:
With our app running, open up a console and write:
curl localhost:8080 This will get us a result similar to the one below.
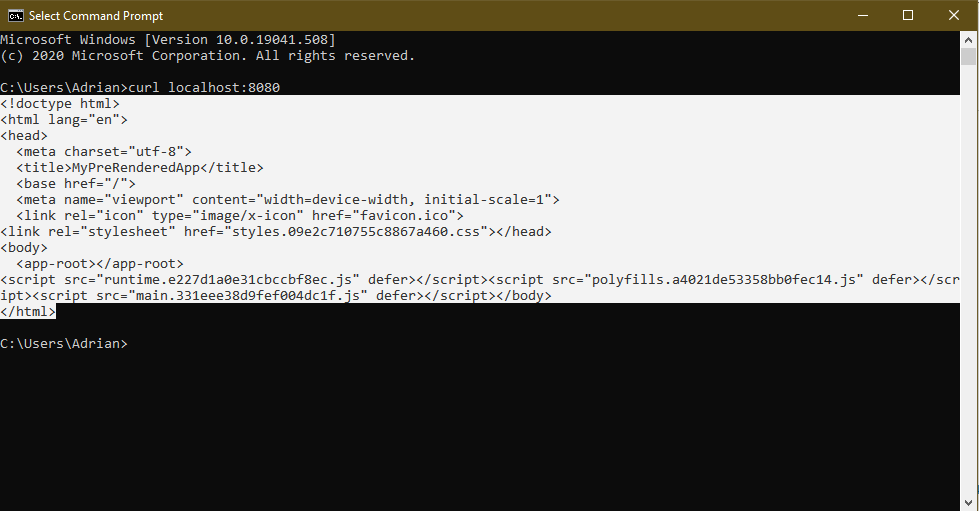
See the highlighted area? That is the response from our server when a crawler requests a page. No content in sight. Just a bare-bones html with some scripts referenced and a tag called <app-root>. That is where Angular would put the content, if the crawler would run the javascript. So if the crawler doesn’t run javascript, which most don’t, it will think that our page has no content, so nothing interesting to index here.
Pre-rendering our Angular app with react-snap
You read this heading and you think: “Hey, wait a minute, react-snap? I thought this was a tutorial about Angular pre-rendering, not React”. Don’t worry, even though the library was inspired by react-snapshot, a library for React pre-rendering, the creator of react-snap made it framework agnostic. The library does not care what SPA framework you are using. You can read more about it here.
What react-snap does behind the scenes is:
It’s actually a very clever way of ensuring the result is a fully functioning static website.
- Gets your production built output files
- Opens Headless Chrome
- Runs the application in it
- Navigates each route that it can find
- Saves each rendered page along the way as a simple html file
It’s actually a very clever way of ensuring the result is a fully functioning static website.
So, let’s have a look at how we use react-snap in our project.
First of all, while in the root folder of our project, run the following command to install react-snap as a development dependency. We install it as a dev dependency and not a normal one because we only need react-snap when we build our project, before we deploy it. We have no need for it at runtime.
npm install react-snap --save-dev This will also download and install puppeteer, our Headless Chrome instance. Be aware that this is quite large at over 140Mb so it might take a while, depending on your connection, or how the servers are feeling that day :D
Next we’ll have to edit our package.json file to configure react-snap to run whenever we build our application for production. So open package.json in your editor of choice and add the following:
Under the “scripts” node add a new entry
/package.json
"postbuild": "react-snap" Just after the “scripts” node, add a new node like this
/package.json
"reactSnap": {
    "source": "dist/my-pre-rendered-app",
    "minifyHtml": {
        "collapseWhitespace": false,
        "removeComments": false
    }
}
Notice the source, it’s important to make sure it corresponds to the name that you’ve used for your app.
Now that the configuration is done we can build our application by running:
npm run build -- --prodNotice the double dashes being used twice here. This is needed in order to pass the “build in prod mode” parameter to npm.
This command will actually trigger “ng build --prod” like you would normally do when building an Angular application, but it also runs the post build step with react-snap that we’ve configured.
The output will look something like this:
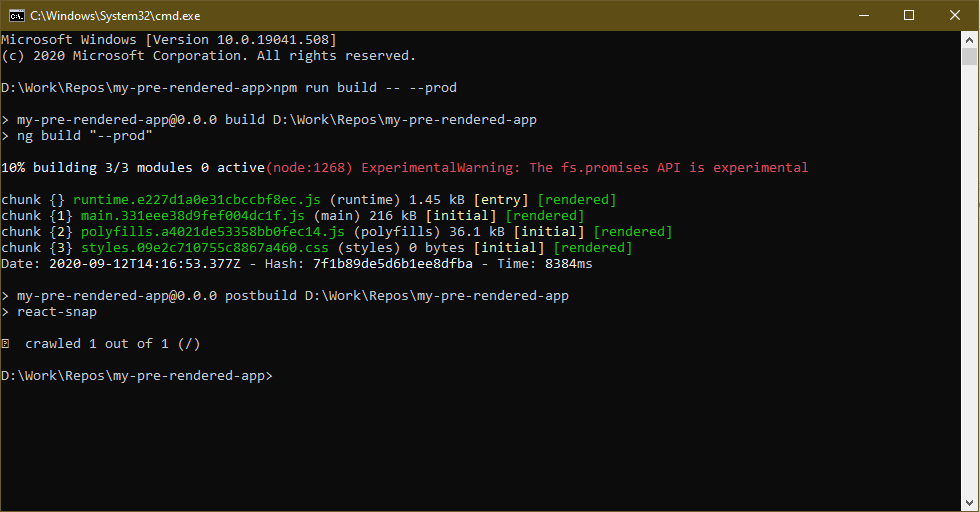
As you can see, after the normal Angular production build, react-snap was run as a post build step and it crawled our application for any pages that it can pre-render. In our case there is just one page.
If you haven’t stopped the previous http-server, the new result is already being served on port 8080. If you did stop it you can start it again by running:
http-server dist/my-pre-rendered-appTake note of the port on which it’s served, normally 8080.
Now let’s check the output of curl in a new command line:
curl localhost:8080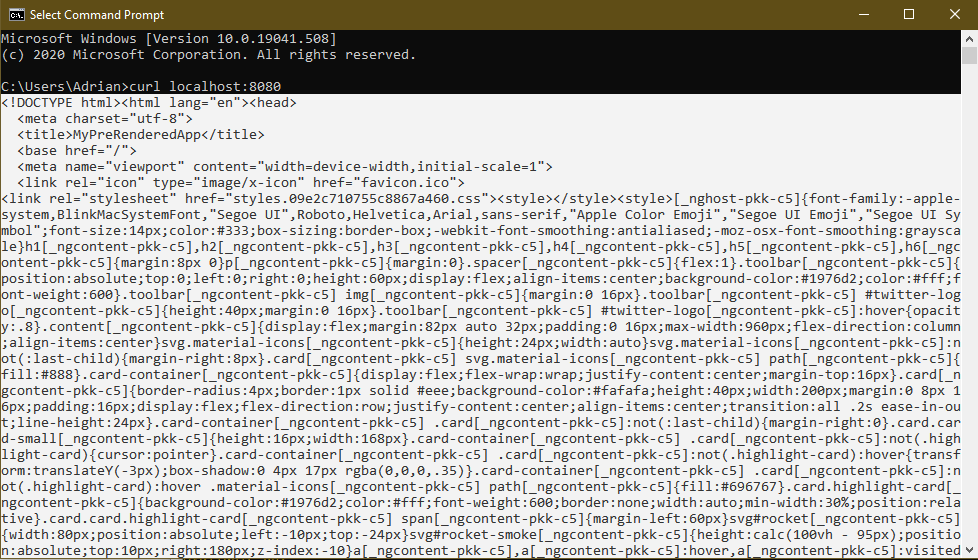
And as you can see, there is a big difference. Now we don’t just get a bare-bones html file. We actually get the fully rendered html page. A page exactly like one rendered by Angular on the client side. Because of this, any search engine crawler that would request this page would get actual content that it can index.
You may wonder what happens when a normal user visits the page, you may be concerned that something would break, but it doesn’t. Angular takes over just like normal and every functionality that the page may have just works. Don’t believe me? Try it for yourself by using a browser instead of curl.
Conclusion
Pre-rendering with react-snap is a great way of making your Angular SPA Seo friendly. And I’ll let you in on a little secret, the page that you’ve just read, it was also pre-rendered in the same way. Now do you believe me that it works?
Happy coding!
Share this article
Article by Adrian Pavel
Adrian is one of the co-founders of Soft Cactus Studio and a full stack developer with over 8 years of experience.